 Everyone who’s anyone’s done it-made self-portraits or had had them shot or painted.
Pablo Picasso, Andy Warhol, Henri Matisse, Dali, and Max Ernst all did.
It’s a simple process, really that documents your existence, and even more, it reveals your character, who you are at any given moment. It represents the likeness of a person that can be caught on canvas or in a photograph or sketched on paper, any of which can be scanned and made into digital art.
In 1932 Gilberte Brassai photographed Pablo Picasso and in 1944 Henri Cartier-Bresson photographed Arnold Newman. Portraits entertain though the expressions of the subject. Some portrait artists collect images of the same person over a lifetime, some, like Cindy Sherman, photograph themselves.
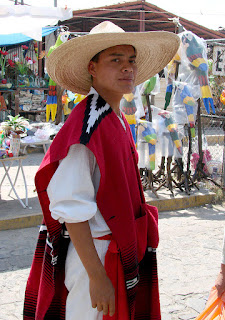
As an artist you can choose who you want to create as your subject from the over-50 women of America’s Red Hat Society to young RAP singers or collect those of everyday people.
All you have to do is put your camera in auto or portrait mode and step back a bit from your subject, then zoom in to 80 mm focal length stepping back or forth until the image is clear when you press the shutter half-way down.
You can take your own self-portrait too--
1. Find a place to sit that's relatively clutter free both in front and in back. If you have to move a chair to the place go for it.
2. Check the lighting keep away from places where everything is casting a shadow.
3. Set your camera to portrait mode, look at the view finder and place the camera (use a tripod if you have to or a chair) so that it's pointing in the area where you will sit when it takes your picture.
4. Set the timer to the longest time there is. The timer shows up on your LCD screen as a clock (without a line crossed through it).
5. Place the camera where you want it (should be far enough so you have to zoom to 80mm to get the portrait) and click on the shutter.
6. Quickly move to the place that you found where you will pose for a picture.
7. After the camera takes the picture look at the LCD screen to see if your head and shoulders are comfortably in the frame. If not zoom in or out to where you think you will be in the frame.
8. Set the timer again and click the shutter.
9. Check to see if you're framed well.
10. Repeat steps 6 to 9, this time practicing a pose, say leaning forward in with your arms resting on your knee (a writer's pose).
Everyone who’s anyone’s done it-made self-portraits or had had them shot or painted.
Pablo Picasso, Andy Warhol, Henri Matisse, Dali, and Max Ernst all did.
It’s a simple process, really that documents your existence, and even more, it reveals your character, who you are at any given moment. It represents the likeness of a person that can be caught on canvas or in a photograph or sketched on paper, any of which can be scanned and made into digital art.
In 1932 Gilberte Brassai photographed Pablo Picasso and in 1944 Henri Cartier-Bresson photographed Arnold Newman. Portraits entertain though the expressions of the subject. Some portrait artists collect images of the same person over a lifetime, some, like Cindy Sherman, photograph themselves.
As an artist you can choose who you want to create as your subject from the over-50 women of America’s Red Hat Society to young RAP singers or collect those of everyday people.
All you have to do is put your camera in auto or portrait mode and step back a bit from your subject, then zoom in to 80 mm focal length stepping back or forth until the image is clear when you press the shutter half-way down.
You can take your own self-portrait too--
1. Find a place to sit that's relatively clutter free both in front and in back. If you have to move a chair to the place go for it.
2. Check the lighting keep away from places where everything is casting a shadow.
3. Set your camera to portrait mode, look at the view finder and place the camera (use a tripod if you have to or a chair) so that it's pointing in the area where you will sit when it takes your picture.
4. Set the timer to the longest time there is. The timer shows up on your LCD screen as a clock (without a line crossed through it).
5. Place the camera where you want it (should be far enough so you have to zoom to 80mm to get the portrait) and click on the shutter.
6. Quickly move to the place that you found where you will pose for a picture.
7. After the camera takes the picture look at the LCD screen to see if your head and shoulders are comfortably in the frame. If not zoom in or out to where you think you will be in the frame.
8. Set the timer again and click the shutter.
9. Check to see if you're framed well.
10. Repeat steps 6 to 9, this time practicing a pose, say leaning forward in with your arms resting on your knee (a writer's pose).
Thursday, December 13, 2007
Digital Photography: How to Take Portraits and Self-Portraits
Everyone who’s anyone’s done it-made self-portraits or had had them shot or painted.
Pablo Picasso, Andy Warhol, Henri Matisse, Dali, and Max Ernst all did.
It’s a simple process, really that documents your existence, and even more, it reveals your character, who you are at any given moment. It represents the likeness of a person that can be caught on canvas or in a photograph or sketched on paper, any of which can be scanned and made into digital art.
In 1932 Gilberte Brassai photographed Pablo Picasso and in 1944 Henri Cartier-Bresson photographed Arnold Newman. Portraits entertain though the expressions of the subject. Some portrait artists collect images of the same person over a lifetime, some, like Cindy Sherman, photograph themselves.
As an artist you can choose who you want to create as your subject from the over-50 women of America’s Red Hat Society to young RAP singers or collect those of everyday people.
All you have to do is put your camera in auto or portrait mode and step back a bit from your subject, then zoom in to 80 mm focal length stepping back or forth until the image is clear when you press the shutter half-way down.
You can take your own self-portrait too--
1. Find a place to sit that's relatively clutter free both in front and in back. If you have to move a chair to the place go for it.
2. Check the lighting keep away from places where everything is casting a shadow.
3. Set your camera to portrait mode, look at the view finder and place the camera (use a tripod if you have to or a chair) so that it's pointing in the area where you will sit when it takes your picture.
4. Set the timer to the longest time there is. The timer shows up on your LCD screen as a clock (without a line crossed through it).
5. Place the camera where you want it (should be far enough so you have to zoom to 80mm to get the portrait) and click on the shutter.
6. Quickly move to the place that you found where you will pose for a picture.
7. After the camera takes the picture look at the LCD screen to see if your head and shoulders are comfortably in the frame. If not zoom in or out to where you think you will be in the frame.
8. Set the timer again and click the shutter.
9. Check to see if you're framed well.
10. Repeat steps 6 to 9, this time practicing a pose, say leaning forward in with your arms resting on your knee (a writer's pose).
Subscribe to:
Post Comments (Atom)
No comments:
Post a Comment